Saturday, December 29, 2012

Christmas Past!

Thankfully, Christmas is over with.  All the ornaments have been sent to new homes.  At this time, I can post pics of a few more that were waiting to go to their new homes.

I have decided to try to get into some craft shows in the fall of 2013, featuring ornaments, eggs and boxes.  To that end, I went to Michaels day before yesterday and bought two 3.5 ft high christmas trees to use as displays and some christmas ribbon.  Went to Hancocks yesterday and bought 7 yards of fabric (6 of which were on sale 70% off) plus i bought more ribbon at 70% off.    The last was the most scrumptious silver brocade I think I have ever seen.  It was originally $19.99 per yard but I had a 50% off coupon,  Yay!!!  I know it will make some absolutely GORGEOUS ornaments or eggs.  Yeah, I've decided to branch out into eggs also....lol!!  Birth Announcement Ornamanets and Eggs, Baby's first Christmas Ornamanets and Eggs, WeddingOrnamanets and  Eggs, Graduation Ornamanets and Eggs.  You name it!  I'll figure it out.  Be sure to check out the birth announcement ornament of my newest grandson.  His picture is on the front and his name and birth information is on the back. 


If you wish to order an ornament, an egg or a box, please leave a comment to that effect.

Now I must hie me away to the phone to make some calls to craft show contact people and then must put all my ornament paraphenalis away in the cart santa brought me for organizing this new and ever growing stash!  Did we ever talk about STASH!!!   Yes, I know we did....lol.  Thanks to Santa this stash will be organized from the get go!!!

I plan to reorganize this blog also so check back to see any changes.  I also plan on posting pics of some eggs in the not too distant future.


Wednesday, November 28, 2012

Christmas Busyness!

Here is it almost December and I am immersed in Christmas!

My kitchen table is piled high with Christmas stuff!  I'm wrapping presents and making ornaments and wrapping ornaments.....lol. 

Remember a while back we talked about Kimekomi ornaments and  Stash!!! 

Well, I'm in love with the Kimekomi method of making ornaments and have made something like 24 ornaments since October 17.....and still have more to make....

Now as to stash!  When I first started with the Kimekomi ornaments, I had a small art bin that held, four 3 inch balls, 6 spools of ribbon, three or four fat quarters and not much else.  Things do seem to change rapidly in my stash world....sigh.  In roughly six weeks, I still have the orignal art bin, a plastic box  from my Grab and Go with fabric in it, several manila envelopes with fabric in them, two boxes with 4 inch balls in them, a revolving desk top organizer for tools, markers, etc.,  half a dozen colors of rat tail cord wrapped around toilet paper cores,  an empty dog food can, an empty instant coffee jar, and a lid from a Wendy's 99 cent frosty and it's growing exponentially.  However, I have decided to organize my stash from the get-go this time.  In fact when my husband asked what I wanted for Christmas I told him I wanted one of these http://www.joann.com/storage-cart-with-8-drawers-multi-16-25-x14-5-x39-75-/zprd_11362498a/.  It should hold considerable stash for a while to come.....I hope!

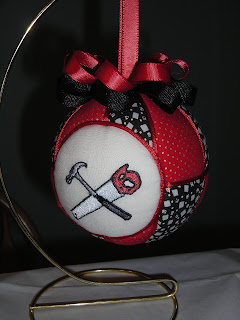
Anyway, here are a few of the ornaments I've made so far.


Well, it's getting late or maybe early...lol....as it's 7:20 a.m. and I've been up for three hours and I must get back to my ornaments.  Hope your holidays are grand!

Wednesday, October 17, 2012

Christmas is coming!

It's been a while since I posted anything, way back to June to be exact.

Although I haven't posted anything I've been very busy.  I'm working on a christmas stocking and have been since March and I'm almost done.  Also been working on a quilt, which is also almost done.

The subject today is Christmas ornaments!   For years I've drooled over the beaded and sequined ornament kits sold at Herrschner's like this one http://www.herrschners.com/zoomimage.aspx?pid=105185 , but have never gotten around to buying and making one.  Just could never decide which one to spend the money on and other crafts have ever been in the forefront.  A while back I stumbled onto this site: http://ornamentdesigns.com/ .

As I surfed through Alyx' pages I started drooling again...lol! And I went shopping for supplies!  Picked up most of the supplies needed but then I wondered if my fingers would hold up to that kind of dexterity...I'm getting slightly arthritic in the fingers and just don't always have the fine motor control like I used to.....something like I don't have the eyes I used to have either.....using a magnifying glass for my cross stitch work is getting close to being the norm these days instead of just a now and then thing....sigh.

Anyway, while surfing on Alyx' site, I came across the Kimekomi section and before I knew it I was ordering a book about it from the library. I've always wanted to make ornaments and have been looking for the best method (for me to do that is) and I think I've found it.  The more I read the more I liked what I read.....so I took the plunge and went shopping AGAIN!  

The method is called Kimekomi, pronounced key-may-ko-mee, and I've fallen in love with it!  I've done a couple of the simple designs that were in the book and thought, Hey!  This is kinda fun.  So I started thinking about making ornaments for my gkids instead of buying them.  Used to be I bought them Hallmark ornaments but that's outside my budget these days and I've never really been happy with some of the ornaments I purchased elsewhere so I thought ok, I'll make some Kimekomi ornaments that fit the gkids' interests.

Here is my first completed ornament, the design of which was in the book.  Needs vast improvement on skills but I will get better!


This is using a 3" ball. 


So since I wasn't completely disappointed I went on to think out my own design and here are front and back pics of that ornament!


 This is using a four inch ball.  Still not perfect, but I shall persevere!


Wednesday, June 13, 2012

A Good Week!....so far!


Yesterday my husband and I celebrated ouf 41st wedding
anniversary. 

When I woke up I found this scrumptious bouquet on the table.  In addition to funds to do some serious stash building, he gives me chocolate!  Does the man know me or what...lol....  We went out to lunch at Red Lobster and it was scrumptious too (thanks Tiff). 

Two typical old farts sitting there and rehashing our wedding day and missing those who are no longer with us that were with us 41 years ago.  We came to the conclusion  that all in all  it's been a hell of a ride....lol...!!


This week I purchased two new books. 

 Hand-Stitched Boxes by Meg Evans.  This book is oh so yummy!  It contains instructions and ideas galore to make a lot of different type boxes using different materials and many different techniques. 

Do you like plastic canvas:?    Do you like crewel embroidery, counted cross stitch or needlepoint?  Or do you just like pretty fabrics?  This book not only has all this and more, but it gives you different levels of expertise to guide you.  Everything from very simple easy to put together boxes, to the more elaborate and involved drop sided boxes.  I just luv those drop sided boxes.....lol

I've already picked out my first project....lol!  Needless to say it has a 5* rating for difficulty....lol.....Surprised?  I didn't think so.  Unfortunately, I'm going to need to do some stash 
building before I actually get started on it!


Chock full of information about goldwork and it's accoutrements.  Something I've been interested in learning more about but haven't got the necessary stash to go with it....lol....YET!

Anyway, I've got a lot of reading and stash building before I can much of anything from either of these books.


Wednesday, May 23, 2012

Finished with Auntie T's Gift

I am finally finished with my latest box.  It is for my husband's aunt who is celebrating her 90th birthday.  Auntie T is a remarkable lady.  She does more volunteer work than anyone else I know.

She has formidable handwork skills.  When I was expecting my first child I received a package in the mail and it was an extraordinary knitted baby afghan.  I was thrilled to receive it.  Auntie T is, I believe, one who will appreciate an item hand made for her.


So here is Auntie T's box.  The ground fabric is a cotton satteen jacquard.  The rose is a vintage pattern and hand embroidered with DMC Floss.


The red twisted cord was made with scarlet Trebizond silk.  I had originally planned to embroider the rose with this silk but found it very difficult to work with.  It snagged on every rough patch of skin I didn't know I had on my hands and fingers, which is why I switched to the DMC.  Couldn't stand the thought of wasting the silk so I made it into twisted cord and it turned out beautifully.


The red nylon ribbon was originally two inches wide so I cut a length into two pieces, one piece is 3/4" wide the other piece is 1 1/4 inch wide.  I stacked them, sewed them togther then gathered them to make the ruffle around the bottom.  Then folded a 2 inch wide length in half to make the band at the bottom and anchored it with a white silk twisted cord.

The inside is a luscious red satin and the embroidered birthday greeting is with white floche.

Saturday, May 19, 2012

Almost there!


Getting to the end.  Here are all the pieces and parts for my newest box.  It's for my husband's aunt who is turning 90 in June.  The white fabric is a cotteon sateen jacquard.  The red ribbon is nylon.  Originally 2 inches wide, I cut one piece into two pieces lengthwise, sewed the two pieces together and gathered it.  The band going around the bottom of the box was folded in half as the ribbon was very transparent. The hand embroidered rose on the lid is a vintage style.  I ended up not using the gold metallic ribbon.  The red twisted cord is made from Tibizond silk.  I stumbled across a Utube video giving instruction about making your own twised cord at this link http://www.youtube.com/watch?v=Aj_GdyCXZ4A&NR=1.  It is not difficult to make and literally only takes seconds to make twisted cord.  It works really well and provides the advantage of being able to match colors with the floss used.


Glueing the ribbon hinge onto the middle of the lid to hold the lid to the box.  The white cord is a simple twised cord purchased from a fabric store. 


Lined with  lucsious red satin with hand embroidered birthday greeting.  I need to glue the upper lid to the box yet and still need to place the red silk cord around the top of the lid.  Almost done though.  All I need to do at this point is to glue the upper lid and twisted cord on top.  Check back in a couple of days for the finished box.


Friday, April 27, 2012

Bible Cover completed!


The Bible cover is completed.  I added  the four way medal (Scapular, Miraculous, St. Joseph and St. Christopher) to one of the ribbons and my granddaughter’s confirmation saint, St. Blaise, to another one.

I’m pretty happy with the way it turned out. 

Tuesday, April 24, 2012

Remember your senior prom?


Sunny but colder today!  I thought we were done with winter but it's come back to haunt us.  Dipped into the 30's last night and supposed to again tonight.....sigh

Here's another finish for you to view.


Complete with rose corsage this young lady box is reminiscent of days gone by, when young ladies received white roses in a corsage to wear to the prom. 

Later the flowers would be pressed in a book for a keepsake (or in Mom's freezer depending on what century it was)  I can't tell you how many flowers were saved in my freezer. over the years...lol
 
Made with seafroam colored cotton velveteen and seafoam and gold lace it is lined with a rich gold satin.  It's simple but sweet and ultra-feminine.


Wednesday, April 18, 2012

Bible Cover update


Here’s the latest update on the bible cover I’m working on. 

The stitching is complete.  I do not know why the fabric puckered….anybody have a clue.  I stretched the fabric very tight and tried to keep it tight.  I haven’t ironed it yet so maybe the puckers will come out then.

You can’t tell in the photo because the upper portion is a little dark but I used a fiber from the Accentuate line of metallic threads.  I used one strand of DMC floss and two strands of the Accentuate.  It provided a soft sort of gleam not anywhere near as bright as Kreiniks.

I must, at this point, critique the Sticky Fabri-Solvy I used to stitch the design on the fabric.  When I ordered the Sticky Fabri-Solvy, I was very optimistic although a trifle skeptical.  I’ve used Solvy products in the past and was pleased with them.  So I was going for broke when I printed out the design onto the solvy from my printer.  There is adhesive on the back although I did use a basting stitch all around the edges for a just in case.  Well, just in case never happened.  After removing the basting threads I still had to PEEL off the extra solvy from around the design, so the adhesive works well.  I then soaked the piece in a bowl of warm leaning toward hot clear water.  I let it sit for about a half hour then swished it around a little bit and low and behold the solvy was GONE!!!  No hype here folks, it really works well.  There is no stiffness left in the fabric and no bleeding of the printer ink.  The Fabri-Solve comes in 8.5 x 11 and 11 x 17 inch sizes.  So I give Sticky Fabri-Solvy five stars.  As always though, you should do a test run on the fabric of your choice just in case!

In my search to purchase the solvy I was forced to go on-line as none of the local fabric/craft stores carried it in stock although they carry a large selection of the solvy product line.  That’s when I found Bird Brain Designs.  As I was skeptical and didn’t want to invest in a whole pack of 12 sheets I ordered a trial sheet from Bird Brain Designs http://www.birdbraindesigns.net/products/755-sticky-fabri-solvy.aspx .  I am in no way affiliated with Bird Brain Designs, just a satisfied customer.   Although they don’t have it listed on their web-site anymore they did in the past and sent me a trial sheet for $2.00 plus $1.95 for shipping, twice.  I don’t know how long the adhesive would last if you kept the packet around for a long time.  I do know that I will be ordering a packet of 12 sheets to keep on hand as I know I will use this product again.

Monday, April 2, 2012

April is here at last!

April is here and the weather is lovely.

Have a completion today.  This little box has been an interesting project with a story behind it. 

I bought the book,  Making Decorative Fabric Covered Boxes by Mary Jo Hiney published in 1996 back in September or October of 2011.  I bought it  with the intention of working on projects from the book after Christmas when the weather was yucky and I couldn’t get out of the house.  I spent several weeks gathering together the supplies and tools needed.  This was also during  the time when we were having the house painted and new carpeting installed and we had to box everything up. 

 In January of this year, I went to the bookcase to get the book and could not find it.  I looked around the house for weeks and still couldn’t find the book.  One day I simply said scr*w it and looked on Amazon to see if I could find another one.  The cheapest one on Amazon was 40 something dollars.  NO WAY !!!  Flipped over onto Ebay and low and behold there was another copy of the book plus two additional pamphlets on making fabric boxes listed for $8.95 including free shipping….Eureka!!  Needless to say I clicked right on it, so I had the book AGAIN!  So far the first one hasn’t shown up but I have no doubt that it will as things I can’t find always show up after I buy another one….lol 

There are 22 projects in this book and I plan to make several of them….not all but a few.

As there are still three empty shelves on my living room book case there is obviously at least one box of books unaccounted for…sigh.  At some point I will find the missing box and the original book will in all likelihood be in it.


Bible Cover update

The Bible cover is coming along pretty well.  The cross is done and consists of stem stitch filling and four shades of topaz floche.  The leaves are almost done.  I decided to outline the leaves as the satin stitching was a little ragged.  There will come a day when I won’t have to outline my satin stitch….yay!!...but not this time.   I’ve started on the flower but am not thoroughly happy with it and may rip the stitches out and start over on them.  I’m not very good at long and short stitch yet.  Except for the flower stitches I’m pretty well pleased with the effort so far.  The curve of the flower stem could be a little smoother  but I think it will pass.  I like the way the date is turning out; I’m doing that in stem stitch also.  Used a font from my msword program. 

I don’t, at this point, know how  I’ll stitch the crown, still cogitating on that one.  Should I follow up with the same colors I did the cross in?  Should I use satin stitch, stick with the stem stitch fill-in or use another stitch entirely?  Should I add a little bling and maybe put small beads or rhinestones on the tips of the crown or not?   Use some rainbow gallery fibers to add a bit of sparkle?  Also, should I use the same light gold for the French knots in the center of the flower or go with a brighter yellow?   Any opinions on these  aspects would be appreciated. 


Stargazer Lilies Bouquet


Some progress has been made on the Stargazer Lilies Bouquet but have been busy on the Bible cover and little box.  Will get back to the lilies soon.  I'm very happy over how it is turning out and can't wait to finish it!

Hope you enjoy looking at my stuff....lol.

The quest for organized stash is ongoing.....sigh.